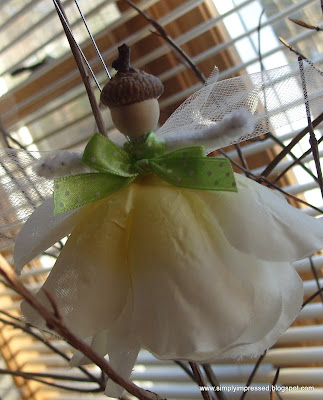
Erica, my partner in the Handmade Gift Exchange, said that her daughters really like the little fairy ornament that I sent her and she would like to make some. So, I decided to post a tutorial to share how these little cuties are made. My sister-in-law and I made a bunch as favors for my daughter's fairy birthday party one year. We sort of just made them up as we went along based on one I had seen in a magazine. I think they came out perfect! They're super simple to make and I have made a lot of them!!
First you will need to gather some supplies: a white or ivory pipe cleaner, an artificial flower, a small acorn cap, a wooden bead, silver or gold cording, ribbon and some tulle....you will also need a glue gun.
Begin by bending the pipe cleaner in half. About 3/4 of an inch from the center fold, bend out about an inch and then back in on each side to form the arms. You will end up with a three pointed star shape like this...
Twist at the neck, arms and waist to form a little body. Don't twist too much though or the pipe cleaner will look matted...
Next, disassemble your flower. When you are choosing your flowers, look for ones that have petals that go all the way around and have a natural bell shape to them, like roses.
Dress your fairy by slipping her legs through the hole in the center of the petals. This fairy is wearing a simple rose petal dress but you can also add leaves or other flower parts to her outfit. Depending on the type of petals you are using, you may need more or less layers. Alternate the petals to fill out the skirt, adding a little hot glue to hold the petals in place. You can play around with different "outfits" first and then add the hot glue when you are happy. Be careful not to snag the petals with the pipe cleaner ends! Add the bead for her head using hot glue.
Wrap a strip of tulle around her body and knot in the back to form her wings. My tulle is on a spool and is 6 inches wide. I use about 12 inches in length and then trim the ends of the wings shorter if needed to suit the overall size of each fairy. You can also use tulle sold by the yard, just cut it to size...
Wrap about a 12 inch piece of ribbon around the back of her neck and cross in front to form bodice....
Wrap ribbon to the back and cross under her wings...
Wrap ribbon back around to front and tie ends into a bow at her waist...
Add acorn cap to the top of her head with a hot glue. If you do not have an acorn cap, you can use anything for a hat like a smaller bell shaped flower. Or, use yarn or other material to make hair. You could also glue a smaller bead to the top of her head as a bun, be sure to cover the hole, and paint hair with craft paint. Trim the ribbon ends...
I also like to gently bend the ends of the pipe cleaner up about 1/4 of an inch on each leg to form little feet...and it helps hide the pokey ends! Add a hanging loop with a small piece of cording and she is ready to hang or tie onto a special gift....adorable!!!
Here are a few other variations that I have made...
If you have any questions about how to make these little fairies just send me an email!
Thanks for visiting!!
~ Julie D.


.JPG)


.JPG)
.JPG)
.JPG)


