Pages

Monday, December 17, 2012

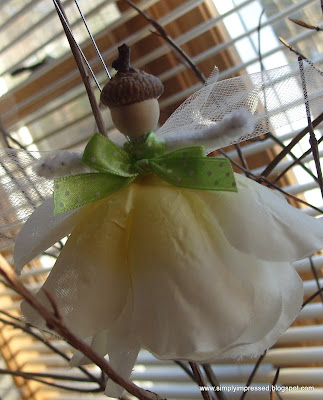
Flower Fairy Ornaments

Erica, my partner in the Handmade Gift Exchange, said that her daughters really like the little fairy ornament that I sent her and she would like to make some. So, I decided to post a tutorial to share how these little cuties are made. My sister-in-law and I made a bunch as favors for my daughter's fairy birthday party one year. We sort of just made them up as we went along based on one I had seen in a magazine. I think they came out perfect! They're super simple to make and I have made a lot of them!!


First you will need to gather some supplies: a white or ivory pipe cleaner, an artificial flower, a small acorn cap, a wooden bead, silver or gold cording, ribbon and some tulle....you will also need a glue gun.


Begin by bending the pipe cleaner in half. About 3/4 of an inch from the center fold, bend out about an inch and then back in on each side to form the arms. You will end up with a three pointed star shape like this... 


Twist at the neck, arms and waist to form a little body. Don't twist too much though or the pipe cleaner will look matted...


Next, disassemble your flower. When you are choosing your flowers, look for ones that have petals that go all the way around and have a natural bell shape to them, like roses. 


 Dress your fairy by slipping her legs through the hole in the center of the petals. This fairy is wearing a simple rose petal dress but you can also add leaves or other flower parts to her outfit. Depending on the type of petals you are using, you may need more or less layers. Alternate the petals to fill out the skirt, adding a little hot glue to hold the petals in place. You can play around with different "outfits" first and then add the hot glue when you are happy. Be careful not to snag the petals with the pipe cleaner ends! Add the bead for her head using hot glue.


Wrap a strip of tulle around her body and knot in the back to form her wings. My tulle is on a spool and is 6 inches wide. I use about 12 inches in length and then trim the ends of the wings shorter if needed to suit the overall size of each fairy. You can also use tulle sold by the yard, just cut it to size...


Wrap about a 12 inch piece of ribbon around the back of her neck and cross in front to form bodice.... 


Wrap ribbon to the back and cross under her wings...


Wrap ribbon back around to front and tie ends into a bow at her waist... 


 Add acorn cap to the top of her head with a hot glue. If you do not have an acorn cap, you can use anything for a hat like a smaller bell shaped flower. Or, use yarn or other material to make hair. You could also glue a smaller bead to the top of her head as a bun, be sure to cover the hole, and paint hair with craft paint. Trim the ribbon ends...


I also like to gently bend the ends of the pipe cleaner up about 1/4 of an inch on each leg to form little feet...and it helps hide the pokey ends! Add a hanging loop with a small piece of cording and she is ready to hang or tie onto a special gift....adorable!!!


Here are a few other variations that I have made...


If you have any questions about how to make these little fairies just send me an email! 

Thanks for visiting!!

~ Julie D.

Thursday, December 13, 2012

For Erica ~ Handmade Gift Exchange

Wow! This has taken me a little longer than I thought to get up here! I wanted to be sure my gift partner had received my package before I posted pics, and then, well, time just got away from me. Anyway, here are the little gifts that I sent to Erica, my partner for the Handmade Gift Exchange. She told me that some of her favorite colors were red and green, how perfect for the holidays!!! I sent her a little fairy ornament, a felt flower clip and, of course, some button jewelry...


...a little candy cane...


...a post-it holder, mini notebook & pen...


...and a set of stamped cards!


I hope she enjoyed receiving them as much as I did making them!

Thanks for visiting!!

~ Julie D.

Thursday, December 6, 2012

Sunday, December 2, 2012

a muse studio 2012 Valentine's Catalog

The Valentine's Day Catalog is now available!! 
All of these new products are so versatile and can be used year-round! 

Click the catalog cover to view...

5 new stamp sets
5 new Splash! colors
Paper straws - 2 new colors
Doilies - two sizes 
Baker's cording - two colors
Grapefruit Chevron cardstock
Sequins - LOVE THESE!!! 
Valentine washi tape assortment - LOVE THIS TOO!!!
Big heart die set - WANT IT!!

The big heart die set is fabulous! It's sized so that it can be used as an A2 card and also includes the word 'love'. It can also make a fantastic banner. Love it!!!  


Visit my website to shop anytime.
Happy Stamping!!

~ Julie D.

Wednesday, November 21, 2012

another gift in the mail!

I mailed my gift to Erica, my Handmade Gift Exchange partner, today. I already received my gift from her and was eager to get mine in the mail. She sent me a box filled with some fabulous crafty things...a banner, a desk calendar, a key fob, a set of cards and some really neat candles, all handmade by her. I loved them all! Thank you Erica!! 


I hope she likes the goodies I sent to her. Check back in a few days to see what's inside the box!

~ Julie D.

Wednesday, November 14, 2012

some more button jewelry...

I just love making these button charm bracelets, I have made lots of them! They are a great way to use my A Muse Studio buttons, which come in some yummy colors, like this pretty pink... 


and the matching earrings....


Love em! I sold some of these at my craft fair over the weekend. I still have a few colors left, if you would like one just email me. They would make a great gift too! (bracelets $8/earrings $4)

Thanks for stopping by!
~ Julie D.

Friday, November 2, 2012

Thursday, October 25, 2012

I'm teaching at the library...

A Muse Studio Holiday Card Class
Thursday, Nov. 15th, 6pm
Hall Memorial Library, Northfield, NH

There is a $5 fee which covers all the supplies needed to make four fabulous stamped projects. 
Please bring along your own detail scissors if you have a pair. 

A huge THANK YOU to Jenna Moulton, the sweetest, most craftiest library director ever!!


 Please call or stop by Hall Memorial Library to register. 
Class samples are on display at the library!

Hope to see you there!! 
~ Julie D

Tuesday, October 16, 2012

Halloween Treat Bags

Check out this cute little Halloween treat bag! I made the rosette using a strip of chevron cardstock and my score board, embellished the center and added a tail...easy peasy! I added a pin to the back so you can wear it as a ribbon if you choose. It would make a great prize ribbon for a costume or pumpkin carving contest!!! All supplies are from A Muse Studio.


Thanks for stopping by!
~ Julie D.

Monday, October 8, 2012

Halloween Cupcakes

Check out these adorable cupcakes designed by A Muse Studio. The Onyx Straws make perfect witch legs! The template for the witch boots was printed on the BACK of a sheet of Onyx cardstock (on the white side) and then cut out. Using a craft knife, make a small slit in the end of a straw, then slide the cut-out shoe into the slit. Love it!
 Twinkle stickers make adorable shiny buttons...
All supplies are from A Muse Studio

Thanks for stopping by!
~ Julie D.

Wednesday, October 3, 2012

Tuesday, October 2, 2012

Pink Pack Hostess Special


Pink Pack Promotion

In addition to regular Hostess Rewards, for the month of October only, hostesses will receive a special Pink Pack - a $50 retail value!

The Pink Pack includes:
  • 3 ink pads - Shell, Watermelon, and Burano
  • 3 ribbons - Shell satin ribbon, Burano satin ribbon, and Shell organdy ribbon
  • a 24-sheet cardstock assortment - 4 each of Shell, Watermelon, Burano, Burano Venetian, Seattle chevron, and Seattle petite polka dot
  • a package of Shell pearl stickers

This special hostess benefit will ship automatically to qualified hostesses.*

* A qualified hostess has workshop total of at least $150 or more in sales, and at least three unique customer orders. 

Contact me to book your workshop today!!

Monday, October 1, 2012

Fight Like A Girl ~ FREE Stamp Set!

A Muse Studio wants to Stamp Out Breast Cancer. 

For the month of October, our goal is to give away 10,000 FREE Fight Like a Girl stamp sets. Included with each stamp set is a brochure on breast health and the importance of early detection from the American Cancer Society.  


Use the pushpin stamp that is included in the Fight Like a Girl stamp set to stamp on your calendar to remind yourself about personal exams, mammograms, and doctor’s appointments.

The Fight Like a Girl stamp set has a retail value of $18, but you can get one for FREE* during the month of October**.
* Please note there is a $3 fee that covers shipping and handling for this stamp set
** Available while supplies last*** Please allow 6-8 weeks for delivery

Click here to get your free stamp set!


FREE 2012-2013 Calendar download
A Muse Studio is pleased to provide this free downloadable calendar as part of our Stamp Out Breast Cancer awareness campaign. This full-page calendar (8.5" x 11") is a fun crafty project and is available in black & white and color. Enjoy!
Download A Muse 2013 Calendar - BW
Download A Muse 2013 Calendar - color

Spread the Word!
Please help us Stamp Out Breast Cancer. Let all of your paper-crafting friends know about this awareness campaign and free stamp set. Here's some easy ways that you can help:
1) Call ten friends and let them know about Stamp Out Breast Cancer.
2) Grab a Stamp Out Breast Cancer blog badge and add it to your blog.
3) Share Stamp Out Breast Cancer on Facebook, Twitter, etc. - it's easy! 
Visit the A Muse Studio facebook page and simply "share" any of our posts.
Together we can make a difference!

Tuesday, September 25, 2012

monster love

I have two more adorable monster projects to share with you today. I know, I know, enough already!! I just can't help it though, they are really that cute! All supplies are from A Muse Studio.

This card was inspired by one made by a very creative fellow consultant, you can see her card here. This fun set can be used in so many ways...I can totally see kid's parties, birthdays, thank you, love and friendship and of course, Halloween! 


I just love how adding the twinkle stickers to the eyes seems to give them personality...so cute!!! 


This next project is straight out of the 2012 A Muse Studio Holiday Catalog. These little sour cream treat containers were so quick and easy to make and best of all...I got four from one piece of card stock!! I do recommend using a super sticky adhesive tape for this project and not to over-stuff them...just a few small candies. What a cute party favor for a monster bash!!! 


Thanks for stopping by!! 

~ Julie D.

Wednesday, September 19, 2012

monster breath?

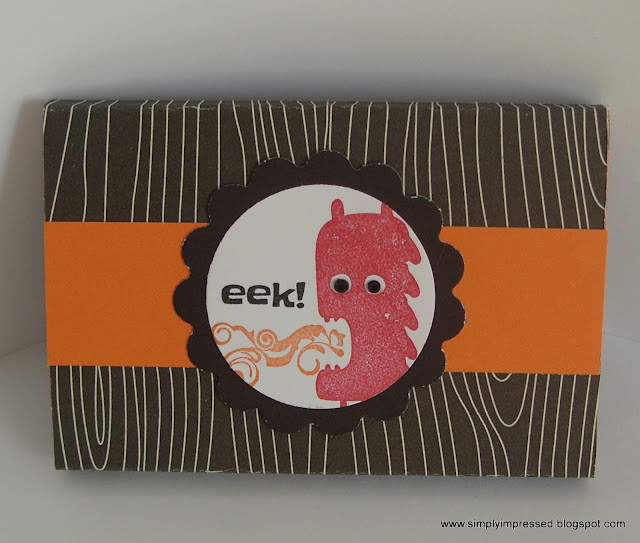
Hi! I have another cute monster project to share with you today...a wrapped pack of gum, perfect for bad cases of monster breath!! All supplies (except punch, Fiskars, and gum) are by a muse studio


There you have it - an easy, quick and (I think) adorable Halloween treat...love it!!! 

Thanks for stopping by!
~ Julie D.

Monday, September 17, 2012

monster match...

Hi there! Here is a fun matching game that I made using a muse studio's monster bash stamp set. I just love these cute little guys and they are not just for Halloween! It makes a perfect little game to keep in your purse for those times when you need to entertain the kidlets, like while waiting for your food at a restaurant!!  


I simply punched out scallop circles from both sugar and polka-dot paper and used a glue stick to attach them together. I doubled them up to make the cards a little sturdier since we will be flipping them over and over again. 
Add a little tag to tie onto the bag for a finishing touch!!


I used a different color of ink for each pair of monsters. There are eight monsters in the set and I wanted an odd number of matches so I made twins using one of the smaller guys. It has been a hit with my daughter and we have already played too many times to count...she loves the monsters too!! Here are all the cards...


All supplies are from a muse studio (except for the punch, which is by Fiskars, and the little bag). 

Thanks for stopping by! 
Julie D.

Tuesday, September 4, 2012

Tuesday, August 21, 2012

hey, cupcake!

Hello! I have a super quick and easy card to share with you today. I know, I know...I say all my cards are quick and easy...and that is just how I like em!! Don't get me wrong, I love being artsy and messy and super creative, when I have time to be. But most of the time when I need a card, I need a card quick! 

All supplies, except for the punch (Martha Stewart), are from A Muse Studio. I love how the petite polka dot paper makes a fancy cupcake liner. And the cherry twinkle sticker is the perfect finishing touch!! 


I had so much making these cute little cards that I made a bunch using different papers and sweet sentiments. And since my daughter always appears when I pull out my stamping supplies...here is the card that she made. 


Clearly six cupcakes are better than one as far as she is concerned!!! 

Thanks for stopping by! 
Stamp On! 
Julie 

Saturday, August 18, 2012

Birthday Robot

 Here is a sweet and simple birthday card that I made for one of my daughter's friends. I just love these little robots...and using twinkle stickers to embellish their buttons!! 


All supplies (except for the twinkle flower) are from A Muse Studio

Thanks for stopping by!
~ Julie D.